
How to Unlock Your Android Phones If You Forgot the Unlock Pattern or Passcode
Forgetting your Android phone unlock pattern or passcode can be frustrating, and many users actually end up forgetting it at some point. While there are many solutions posted on the Internet about how to deal with this situation, only a few of them actually work. Some of the solutions that work require you to download apps and install them on your Android phone, others need you to sign in with your Gmail account, and finally, others will erase all of your data from the Android phone, returning it to factory settings.
 Depending on your particular situation, you may want to choose a certain solution to bypass your unlock pattern or passcode. If you have just bought the Android phone and did not have time to store any information on it, erasing all of the data will certainly not be a problem. But if you had the Android phone for a long time and have many contacts and personal information stored in it, you may want to look for alternatives. Especially if you haven’t backed up your information anywhere else. Here are three simple solutions to unlock Android phones:
- Logging on to Android phones with the Gmail account
1. Type the wrong password or pattern for five times
Depending on your particular situation, you may want to choose a certain solution to bypass your unlock pattern or passcode. If you have just bought the Android phone and did not have time to store any information on it, erasing all of the data will certainly not be a problem. But if you had the Android phone for a long time and have many contacts and personal information stored in it, you may want to look for alternatives. Especially if you haven’t backed up your information anywhere else. Here are three simple solutions to unlock Android phones:
- Logging on to Android phones with the Gmail account
1. Type the wrong password or pattern for five times
2. After the fifth mistype, an option called ‘Forgot Pattern’ will appear in the bottom right side of the screen – click on it
3. Log in with your Google username and password associated with the respective Android phone
4. You can now draw a new pattern and confirm the change.
- Downloading Apps
1. Log in to the Android Market on your computer
2. Install the ‘Screen Lock Bypass’ App to your Android phone
3. Install another application – the application will run and disable the screen lock
4. The application runs each time you boot the Android phone and bypass the screen lock.
- Restoring the Android phone to factory settings
1. Switch off the Android phone
2. Press the volume button up and down
3. Press the power button and keep holding it with the volume up button
4. Keep pressing until the terminal interface appears on the Android phone
5. Navigate through the terminal using the home button
6. Choose the option to delete all user data
7. Your device will restart after several moments and it will reboot with factory settings.
Be careful if you want to use the last solution to bypass your Android phone’s code, as you will actually lose all information on it, including contacts. Only choose this if you have a backup for any personal or important information. The first option has been known to fail for some users, but others managed to use it successfully. The second option is optimal for most users, but it’s not a solution in itself, as it never changes the password, but it simply bypasses it every time you open your Android phone.
2. After the fifth mistype, an option called ‘Forgot Pattern’ will appear in the bottom right side of the screen – click on it
3. Log in with your Google username and password associated with the respective Android phone
4. You can now draw a new pattern and confirm the change.
2. Install the ‘Screen Lock Bypass’ App to your Android phone
3. Install another application – the application will run and disable the screen lock
4. The application runs each time you boot the Android phone and bypass the screen lock.
2. Press the volume button up and down
3. Press the power button and keep holding it with the volume up button
4. Keep pressing until the terminal interface appears on the Android phone
5. Navigate through the terminal using the home button
6. Choose the option to delete all user data
7. Your device will restart after several moments and it will reboot with factory settings.
How to Reboot Your Android Phone or Tablet Into Safe Mode

If you’re having issues with your Android device and need to troubleshoot which of your two hundred apps might be causing an issue use this trick to boot into safe mode—on Android this means that the OS will load without any third-party apps.
The How-To Geek shares two methods to boot your Android device into safe mode: If you have Jellybean (4.1 or later) long-press the power button until the power options menu appears and then long-press the power off button. You should be asked if you want to reboot your phone into safe mode.
On older phones (or Jellybean phones whose UI doesn’t work with the previous technique like my Samsung Galaxy Note 2) simply reboot your phone and hold down both the volume up and volume down buttons while the phone is booting. The words safe mode should appear on the bottom of your screen.
If your phone doesn’t have the same issue (crashing, freezing, battery life problems, etc.) then you can be reasonably sure it was caused by a third-party app. Try uninstalling your most recently added apps first and you should eventually find the culprit. If you’re still having the same issue in safe mode you may want to restore your phone to factory settings. For more details, visit the source link below.
Read more at: How to Boot Your Android Phone or Tablet Into Safe Mode | The How-To Geek
VIA | Lifehacker.com

Back that app up: 5 great backup utilities for Android

You try to stifle back a tear as you pick up your phone, noticing just how broken it really is. Suddenly, all of the good times you'd had together flash before your eyes. You and your partner in crime... and now it's gone.
You have insurance through your carrier and you'll have a new phone in two weeks, but what you didn't have was the insurance that your memories with your smartphone remained intact. You had never backed it up, not even once.
Of course, I'm talking about myself. In second person.
All of my photos text messages were gone, never to be seen again. After that realization, the biggest blow came. My Flappy Bird score, gone. Along with my Candy Crush level progress, because I refused to sign in with Facebook.
All gone.
One day, you too will know my pain. Unless you back up your phone.
Most of the applications you’ll find below are capable of doing much more than just backing up and restoring applications. To keep things simple, I’ll be discussing how easy it is to back up and restore applications first and foremost, and go on to more notable features from there.
Helium
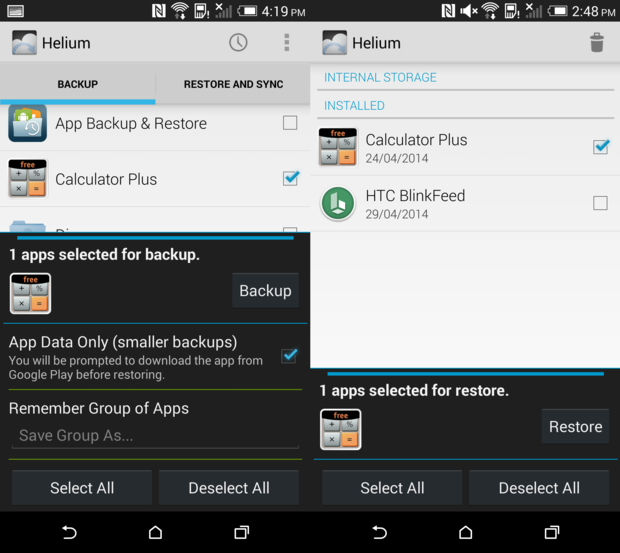
Helium was released a little over a year ago and has become a fan favorite. Not only can you backup your apps and data to your phone or cloud storage services, but you can also sync data from one device to another.
By default, Helium backs up only app data so your file size is smaller, saving you time in the process. Of course, it’s just a swipe and tap away to save the entire application to the internal storage of your phone, if it’s not a protected application.
Outside of regular apps and app data, you can just as easily backup SMS conversations, Wi-Fi connection settings, user dictionaries, and more. For simple backups and restores directly onto the phone, it doesn’t get much easier.
Install Android KitKat Launcher On Any Jelly Bean Device
Google has kicked up another notch by presenting the best looking stock Android launcher yet. If you can’t wait to get your hands on it, we’ve got some good news for you. The launcher files have already been uploaded to the internet, and you grab them to try it on your own device running any version of Jelly Bean. Just follow our full guide to get it up and running.
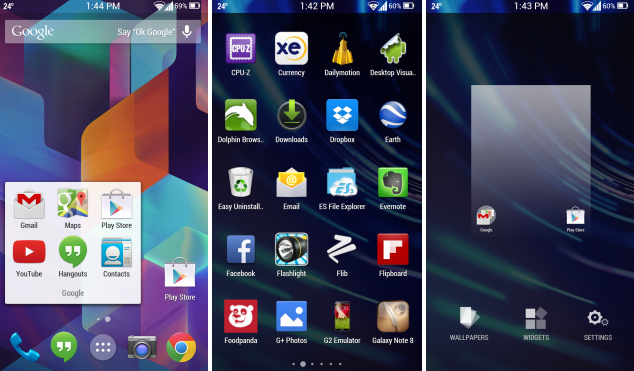
It’s worth noting that Google Experience Launcher may not work on all phones, and you may face force close issues. In our own testing, the launcher didn’t face any problem whatsoever on the international variant of Galaxy S4, but your mileage may vary depending on your device. We advise that you create a backup before proceeding.
Requirements
- A phone running Android 4.1, 4.2 or 4.3 Jelly Bean
- Google Experience Launcher files. The archive contains:
- PreBuiltGmsCore.apk (Google Play Services 4.0)
- Velvet.apk (Google Search)
- GoogleHome.apk (Launcher)
Procedure
- Again, to be on the safe side we recommend that you create a backup first to avoid any issues
- Next up, download the ZIP fie provided in the link above and extract its contents to an easily accessible location. You can download the file to your PC and transfer them to your device, or you can download it straight to your Android device and extract the archive using any file extraction app.
- Now, install all three files available in that folder one by one by simply tapping on them, or sideloading them via ADB form your computer.
- Once done, simply press Home and select the new Launcher as default.
Note: If you face Google Search Force Close issue, just long-press the home screen in the new launcher, select Settings and then tap Voice. Select Language to change the default. You can change to any another language and then again back to your own language by following the same procedure.
Android PCs and other Windows-alternative desktops are for real
| See realtime coverage |
You know Android as the number one smartphone and tablet operating system. Four big-name companies thinkAndroid has what it takes to be a top desktop operating system as well.
 |

How To Block Phone Calls and Text Messages On Your Android Phone
How To Block Phone Calls and Text Messages On Your Android PhoneIf you have an ex you never want to hear from again or telemarketers are spamming you day and night with annoying phone calls, fear not, blocking phone calls and text messages on Android Phones is fairly easy and doesn't necessarily require any extra apps to install. We’ll take a look at how to do it without apps and we’ll recommend you some call blocking apps for android that are worth considering.
Blocking Text messages On Your Android Phone
When receiving an unwanted text message on your Android phone, just click on the particular message for 3 seconds and a menu will pop up, giving you the option to Register as Spam number. After doing this, messages from that number will land in your Spam folder and you won’t receive notifications anymore when receiving a spam text. To access your spam inbox, hit the menu button and click Spam Messages.
Blocking Calls On Your Android Phone
According to which android phone and Android version you are using, the process might differ a bit. We’ll first have a look on how to do it on a Samsung Galaxy S3 and we’ll then look at a workaround method for other Android Phones.
Start by navigating to Phone > Menu > Call settings > Call rejection > Auto reject list. You’ll have the choice of selecting auto reject for all unknown numbers by simply ticking the “Unknown” box or you can tap Create to enter specific number you wish to have blocked. You can also add contacts to the reject list by navigating through your contacts, hitting the menu button and selecting Add to reject list.
Rejecting a call with a text message is also possible by dragging Reject call with message up when a call comes is. If you want to add a customized text message to the reject list, go to Phone > Menu > Call settings > Set reject messages and add a custom text there.
Sending callers straight to voicemail is also a handy option featured in most stock versions of Android. Go to the contact in question, hit Menu, select Options and then check incoming calls. This will send calls from that particular contact directly to voicemail.
All Android smartphones should have the option to auto reject calls from specific contacts but unfortunately some carriers block this feature to offer services of their own. Generally, their features can be found in the Parental Controls Option but they might charge you for the service.
Using Google Voice To Block Calls
Google Voice users will be glad to hear that it supports spam filters and includes a database of known spam numbers which are blocked automatically. Another option is blocking a caller completely instead of sending them to voicemail.
To configure call rejects and more, navigate to Contacts, tick the box next to the contact you wish to block and choose Edit Google Voice Settings > When this contact calls you and choose between Sent to voicemail, Treat as spam or Block caller.
Turning on automatic spam filtering in Google Voice is done by navigating to Voice Settings > Call and tick Global Spam Filtering.
Android Apps To Block Phone Calls and Text Messages
If you are looking for a more user friendly option to filter your phone calls then one of the next three Android Apps might suite you.
Presenting itself as a Free Alternative to calling and texting, Mr. Number offers free messaging between members and real-time updates on when your messages have been read. Also featuring a powerful call and text blocking tool, the app allows you to block specific numbers or area codes. User submitted info keeps Mr. Number up to date about telemarketers and other spam.
Another Android App using user submitted numbers is Call Control, which you can then select to automatically block those incoming calls. Letting you decide which calls get blocked and which once don’t and how those calls get handled, Call Control is a versatile app. The first 14-days, the full app is available as trial version, after that, the app reverts to a limited “Lite” version. If you wish to purchase the full app, you’ll have to cough up $8.
For a onetime $6 fee, Extreme Call Blocker offers a comprehensive call and text message blocking app which is password protected and can run in stealth mode on an Android Phone. Send calls directly to voice mail, pick up and hang up automatically, or just mute the ringer. Also blocking outgoing calls, this app offers solid options with extended blocking features and the ability to set up profiles with various parameters.
For a onetime $6 fee, Extreme Call Blocker offers a comprehensive call and text message blocking app which is password protected and can run in stealth mode on an Android Phone. Send calls directly to voice mail, pick up and hang up automatically, or just mute the ringer. Also blocking outgoing calls, this app offers solid options with extended blocking features and the ability to set up profiles with various parameters.
Enjoy a Spam Free Life
Many other Android call blocking apps are available out there so do your homework carefully before installing. Most of these apps don’t play nicely together, so try to only use one. Also, your Mobile Anti Virus might conflict with call blocking apps.
Do you use any caller blocking apps? What works best for you? Or are you lucky enough to stay spam free on your phone? Let us know in the comments below.
Do you use any caller blocking apps? What works best for you? Or are you lucky enough to stay spam free on your phone? Let us know in the comments below.
No comments:
Post a Comment